Face swap example in OpenCV with Processing (v.1)

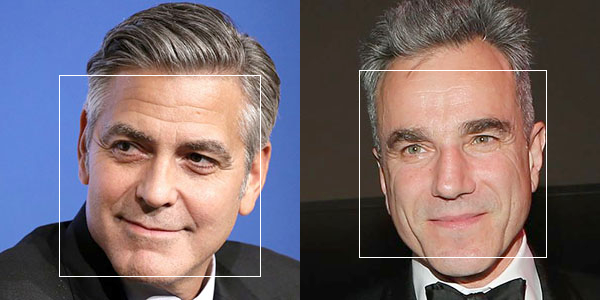
After the previous 4 exercises, we can start to work on with the OpenCV face swap example in Processing. With the two images, we first compute the face landmark for each of them. We then prepare the Delaunay triangulation for the 2nd image.  Based on the triangles in the 2nd image, we find corresponding vertices in the 1st image. For each triangle pair, we perform the warp affine transform from the 1st image to the 2nd image. It will create the face swap effect.

Note the skin tone discrepancy in the 3rd image for the face swap.

Full source code is now available at the GitHub repository ml20180820a.

Delaunay triangulation of the face contour in OpenCV with Processing

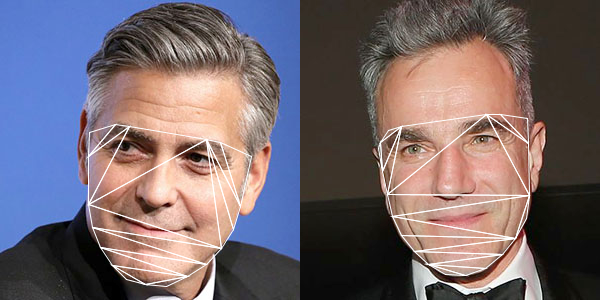
The 4th exercise is a demonstration of the planar subdivision function in OpenCV to retrieve the Delaunay triangulation of the face convex hull outline that we obtain from the last post. The program will use the Subdiv2D class from the Imgproc module in OpenCV.

Subdiv2D subdiv = new Subdiv2D(r);

where r is am OpenCV Rect object instance defining the size of the region. It is usually the size of the image we are working on. For every point on the convex hull, we add it to the subdiv object by,

subdiv.insert(pt);

where pt is an OpenCV Point object instance. To obtain the Delaunay triangles, we use the following codes,

MatOfFloat6 triangleList = new MatOfFloat6();
subdiv.getTriangleList(triangleList);
float [] triangleArray = triangleList.toArray();

The function getTriangleList() will compute the Delaunay triangulation based on all the points inserted. It will return the result in the variable, triangleList. This variable is an instance of MatOfFloat6, and which is a collection of 6 numbers. The first pair of numbers are the x and y position of the first vertex of the triangle. The second pair of numbers are for the second vertex. The third pair of numbers are for the third vertex of the triangle. Based on this, we can draw each triangle in the Delaunay triangulation process, as shown in the image below.
Complete source code is now available in my GitHub repository at ml20180819b.

Face landmark convex hull detection in OpenCV with Processing

The 3rd exercise is the demonstration of obtaining the convex hull of the face landmark points in the OpenCV Face module. The program based on the face landmark information collected from the last post to find out the convex hull of the face detected.

The function is provided by the Imgproc (image processing) module of OpenCV. In the sample program, the following command will obtain the each point information of those points on the convex hull of the polygon.

Imgproc.convexHull(new MatOfPoint(p), index, false);

The first parameter, variable p is an array of type Point in OpenCV. The second parameter, index, is the returned value of type MatOfInt indicating all the points along the convex hull boundary. The integer value is the index in the original array p. The third parameter, false, indicates the clockwise orientation is false. By traversing the array index, we can obtain all the points along the convex hull.

The complete source code is now in my GitHub repository ml20180819a.

Face landmark detection in OpenCV Face module with Processing

The 2nd exercise is a demonstration using the Face module of the OpenCV contribution libraries. The official documentation for OpenCV 3.4.2 has a tutorial on face landmark detection. The Face module distribution also has a sample – Facemark.java.  This exercise is derived from this sample. There are 2 extra parameter files. One is the Haar Cascades file,  haarcascade_frontalface_default.xml we used in the last post for general face detection. The other one is the face landmark model file face_landmark_model.dat that will be downloaded during the building process of the OpenCV. Otherwise, it is also available at this GitHub link.

The program uses the Facemark class with the instance variable fm.

Facemark fm;

It is created by the command.

fm = Face.createFacemarkKazemi();

And load in the model file with the following,

fm.loadModel(datPath(modelFile));

where modelFile is the string variable containing the model file name.

Complete source code is in this GitHub repository.


Face detection with the OpenCV Face module in Processing

This will be the series of tutorials to elaborate the OpenCV face swap example. The 1st one is a demonstration of the face detection of the Face module, instead of using the Object Detection module. The sample program will detect faces from 2 photos, using the Haar Cascades file, haarcascade_frontalface_default.xml, located in the data folder of the Processing sketch.

The major command is

Face.getFacesHAAR(im.getBGR(), faces, dataPath(faceFile));

where im.getBGR() is the photo Mat returned from the CVImage object, im, faces is a MatOfRect variable returning the rectangle of all faces detected, and faceFile is a string variable containing the file name of the Haar Cascades XML file.

Complete source code is in the website GitHub repository, ml20180818a.


Darknet YOLO v3 testing in Processing with the OpenCV DNN module

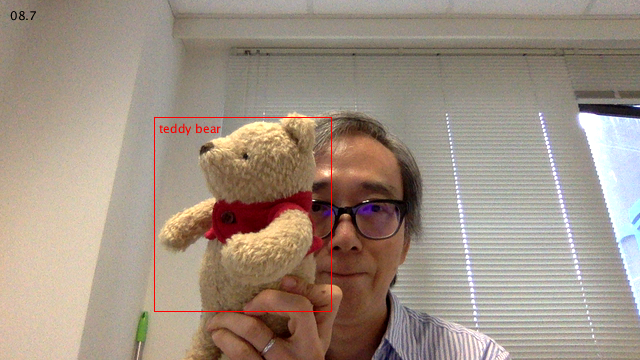
This is the third demo of the OpenCV Deep Neural Network (dnn) module in Processing with my latest CVImage library. In this version, I used the Darknet YOLO v3 pre-trained model for object detection. It is based on the object_detection sample from the latest OpenCV distribution. The configuration and weights model files for the COCO datasets are also available in the Darknet website. In the data folder of the Processing sketch, you will have the following 3 files:

  • yolov3.cfg (configuration file)
  • yolov3.weights (pre-trained model weight file)
  • object_detection_classes_yolov3.txt (label description file)


You can download the source code in my GitHub repositories.

OpenPose in Processing and OpenCV (DNN)

This is the 2nd test of the OpenCV dnn module in Processing through my CVImage library. It used the OpenPose pre-trained Caffe model.

Since the OpenCV dnn module can read the Caffe model through the readNetFromCaffe() function, the demo sends the real time webcam image to the model for human pose detection. It made use of the configuration file openpose_pose_coco.prototxt and the saved model pose_iter_440000.caffemodel. The original reference of the demo is from the openpose.cpp official OpenCV sample and the Java implementation from  the GitHub of berak. You can download the model details below

The description of the OpenPose output can be found in their official GitHub site. The figure below is the posture information I used in my demo.

Again, the source code is maintained in my Magicandlove repositories of my GitHub. You can download from here.

Deep Neural Network (dnn) module with Processing

This is my first demo run of the dnn (deep neural network) module in OpenCV 3.4.2 with Processing, using my CVImage library. The module can input pre-trained models from Caffe, Tensorflow, Darknet, and Torch.  In this example, I used the Tensorflow model Inception v2 SSD COCO from here. I also obtained the label map file from the Tensorflow GitHub. The following 3 files are in the data folder of the Processing sketch.

  • frozen_inference_graph.pb
  • ssd_inception_v2_coco_2017_11_17.pbtxt
  • mscoco_label_map.pbtxt

The source code is in my GitHub repository of this website here.

TensorFlow in Processing

The Java binding for the Google Deep Learning library, TensorFlow is now available. The binary library files for version 1.1.0-rc1  are also available for download here. Below is the code for the Hello World program included in the distribution that I modified for Processing.
 

import org.tensorflow.Graph;
import org.tensorflow.Session;
import org.tensorflow.Tensor;
import org.tensorflow.TensorFlow;
 
Graph g1;
Output o1;
Output o2;
Output o3;
PFont font;
String res;
 
void setup() {
  size(640, 480);
  noLoop();
}
 
void draw() {
  background(0);
  Graph g = new Graph();
  String value = "Hello from " + TensorFlow.version();
  Tensor t = null;
  try {
    t = Tensor.create(value.getBytes("UTF-8"));
  } 
  catch (Exception e) {
    println(e.getMessage());
  }
  g.opBuilder("Const", "MyConst")
    .setAttr("dtype", t.dataType())
    .setAttr("value", t)
    .build();
  Session s = new Session(g);
  Tensor output = null;
  try {
    output = s.runner()
      .fetch("MyConst")
      .run()
      .get(0);
    println(new String(output.bytesValue(), "UTF-8"));
  } 
  catch (Exception e) {
    println(e.getMessage());
  }
}