MediaPipe in TouchDesigner 2

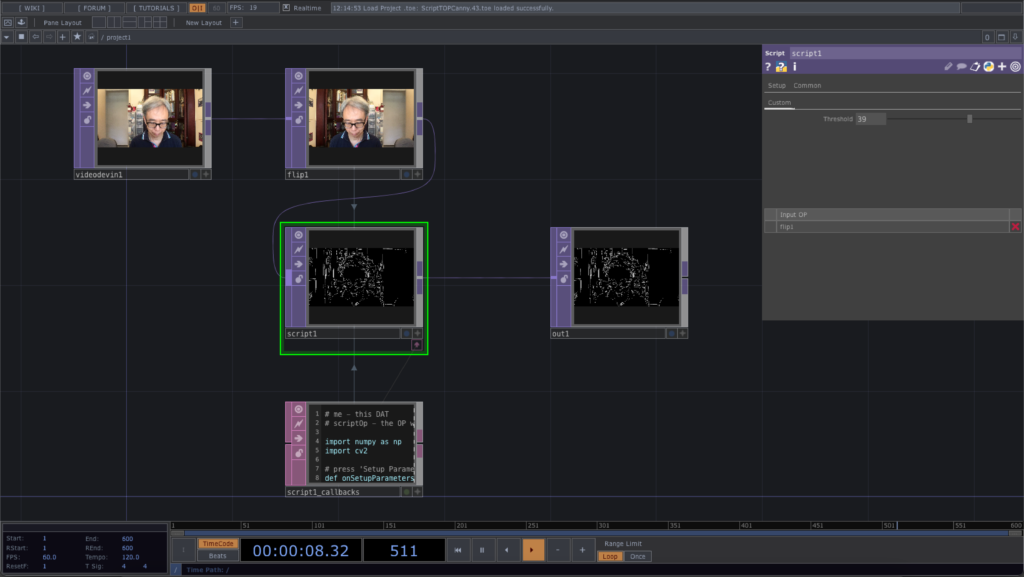
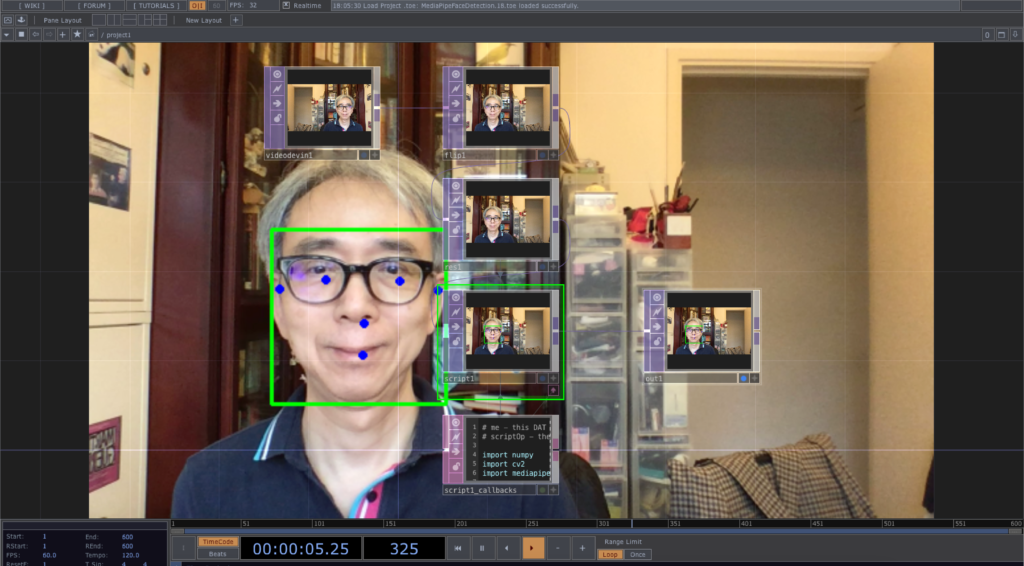
Now we are ready to integrate the MediaPipe functions in TouchDesigner after we learnt the basic of the Script TOP. The first one we are going to do is the Face Detection. We just use the Script TOP to display the bounding boxes of the detected faces without sending the face details elsewhere for processing. In the next example after this, we shall send the bounding box details to a Script CHOP.

In order to have the mirror image effect, we use the Flip TOP with a horizontal flip. We also add a Resolution TOP to reduce the original 1280 x 720 to half, i.e. 640 x 360 for better performance. Of course, we can achieve the same result by changing the Output Resolution of the Flip TOP from its Common tab.
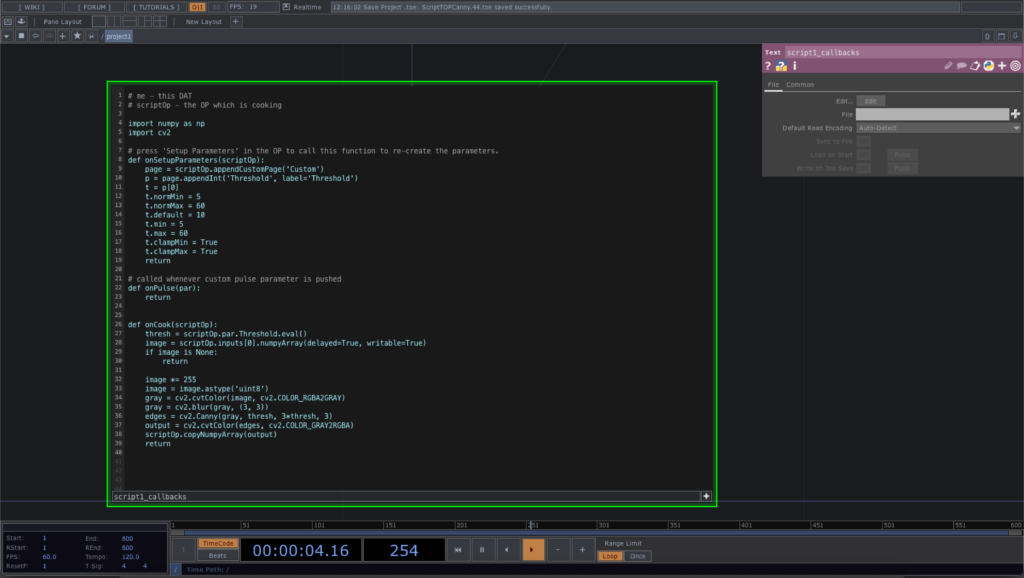
# me - this DAT
# scriptOp - the OP which is cooking
import numpy
import cv2
import mediapipe as mp

mp_face = mp.solutions.face_detection
mp_drawing = mp.solutions.drawing_utils

face = mp_face.FaceDetection(
     min_detection_confidence=0.7
 )

# press 'Setup Parameters' in the OP to call this function to re-create the parameters.
def onSetupParameters(scriptOp):
    return
# called whenever custom pulse parameter is pushed
def onPulse(par):
    return

def onCook(scriptOp):
    input = scriptOp.inputs[0].numpyArray(delayed=True)
    if input is not None:
        frame = cv2.cvtColor(input, cv2.COLOR_RGBA2RGB)
        frame = cv2.flip(frame, 0)
        frame *= 255
        frame = frame.astype('uint8')
        results = face.process(frame)
        if results.detections:
            for detection in results.detections:
                mp_drawing.draw_detection(frame, detection)

        frame = cv2.flip(frame, 0)
        scriptOp.copyNumpyArray(frame)
    return

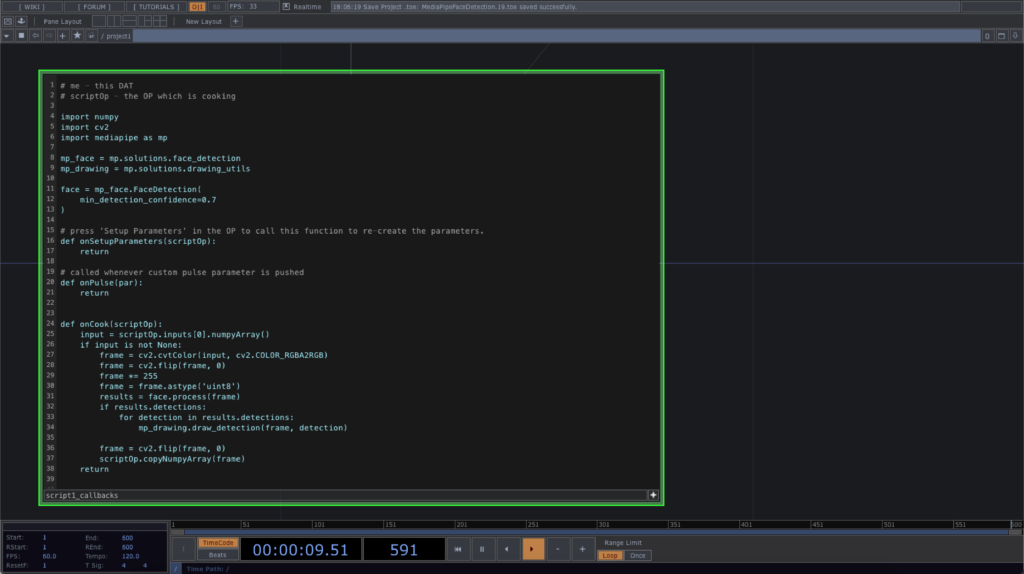
In the first place, we need to import MediaPipe into the Python code. The next step is to define a few variables to work with the face detection, mp_face and visualisation of the detected face, mp_drawing, and finally the face detection class instance, face, with the detection confidence value.

To process the video, we also convert the RGBA frame into RGB only. It is found that the image format MediaPipe face detection expected is vertically flipped as compared with the TouchDesigner TOP. In the Python code, we first flip the image vertically before sending it to the face detection with face.process(frame). After the mp_drawing utility draws the detection results onto the frame, we also flip the image vertically again for output to the Script TOP. The object, results.detections contains all the details of the detected faces. Each face will be visualised with a bounding box and 6 dots indicating the two ears, eyes, nose tip and the mouth centre.

The TouchDesigner project file is in this GitHub repository.

Script TOP in TouchDesigner – Canny Edge Detector

After the first introduction of the Script TOP, the coming example will implement the Canny Edge Detector with OpenCV in TouchDesigner as a demonstration. TouchDesigner already includes its own Edge TOP for edge detection and visualisation.

We also implement a slider parameter Threshold in the Script TOP to control the variation of edge detection.

Here is the source code of the Script TOP. Note that we have made a lot of changes in the default function, onSetupParameters to include a custom parameter, Threshold as an integer slider. It will generate a value between 5 and 60, to be used in the onCook function as a threshold value for the Canny edge detection.

# me - this DAT
# scriptOp - the OP which is cooking
import numpy as np
import cv2
# press 'Setup Parameters' in the OP to call this function to re-create the parameters.
def onSetupParameters(scriptOp):
    page = scriptOp.appendCustomPage('Custom')
    p = page.appendInt('Threshold', label='Threshold')
    t = p[0]
    t.normMin = 5
    t.normMax = 60
    t.default = 10
    t.min = 5
    t.max = 60
    t.clampMin = True
    t.clampMax = True
    return

# called whenever custom pulse parameter is pushed
def onPulse(par):
    return

def onCook(scriptOp):
    thresh = scriptOp.par.Threshold.eval()
    image = scriptOp.inputs[0].numpyArray(delayed=True, writable=True)
    if image is None:
        return

    image *= 255
    image = image.astype('uint8')
    gray = cv2.cvtColor(image, cv2.COLOR_RGBA2GRAY)
    gray = cv2.blur(gray, (3, 3))
    edges = cv2.Canny(gray, thresh, 3*thresh, 3)
    output = cv2.cvtColor(edges, cv2.COLOR_GRAY2RGBA)
    scriptOp.copyNumpyArray(output)
    return

The first line in the onCook function is to retrieve the integer value from the parameter, Threshold. We also exit the function when there is not valid video image coming in. For the edge detection, we convert the RGBA image into grayscale and then perform a blur function. the cv2.Canny function returns the detected edges in a grayscale image, edges. Finally, we convert the edges into a regular RGBA image, output, for subsequent output as before.

The final TouchDesign project is available in this GitHub repository.

Script TOP in TouchDesigner

Before we start using MediaPipe in TouchDesigner, we need to be familiar with the use of the Script TOP and Script CHOP first. For the Script TOP, we can generate the image (TOP) directly from Python code. In the following example, we are going to pass through the incoming image from Video Device In TOP to the output window with minimal manipulation in Python inside the Script TOP. The OpenCV in TouchDesigner reference page in the Derivative website is a good starting point.

We create a very simple TouchDesigner project, connecting the Video Device In to the Script TOP and then to the Output window. Note that the Script TOP comes with an associated Script Text DAT. We are going to modify the default Python code inside this text area with the name script1_callbacks.

We can directly edit the Python code inside the Text DAT by turning on the Viewer Active button in the bottom right corner. Alternately, we can click the Edit button in the parameter window to open the code in your default code editor, XCode in my case.

# me - this DAT
# scriptOp - the OP which is cooking
import numpy as np
# press 'Setup Parameters' in the OP to call this function to re-create the parameters.
def onSetupParameters(scriptOp):
     page = scriptOp.appendCustomPage('Custom')
     p = page.appendFloat('Valuea', label='Value A')
     p = page.appendFloat('Valueb', label='Value B')
     return

# called whenever custom pulse parameter is pushed
def onPulse(par):
    return

def onCook(scriptOp):
    image = scriptOp.inputs[0].numpyArray(delayed=True, writable=True)
    image *= 255
    image = image.astype('uint8')
    scriptOp.copyNumpyArray(image)
    return

The code has 3 functions, onSetupParameters, onPulse and onCook. We only use the onCook for this example. Cooking is the update of a node when necessary for very frame. The detailed explanation can be found from the TouchDesigner Cook page. Essentially, we can consider it as frame by frame update of the node we are working on. The first function, onSetupParameters is triggered by a button in the parameter window under the Setup tab. We can consider it the initialisation of the process. The second function, onPulse, will not be used here since we do not have any Pulse button or Pulse parameters defined here. We are going to walk through the simple onCook function.

In the first line, scriptOp (the current node), will retrieve its first input, 0, (the Video Device In) and convert the current video frame in a NumPy array. The format of the array is Height x Width x RGBA. Each colour pixel is a 32 bit floating point number within the range of 0 to 1. In our case, the video size is 1280 x 720. The 2 optional parameters, delayed=True and writable=True will be explained in the TOP class reference. In this example, we aim to convert the 32 bit floating point colour format to 8 bit unsigned integer for output.

In the second line, each colour pixel will multiply 255 by itself to convert the colour range between 0 to 255.

The third line, the NumPy array is modified into 8 bit unsigned integer format, uint8.

The last line will copy back the NumPy array, with the function copyNumpyArray, into the Script TOP texture for output.

The final TouchDesigner project can be downloaded from this GitHub repository.